

Sling Removal Guide: 7 Effortless Steps to Disassemble Your Patio Chair
When your beloved patio chairs show signs of wear, a clear Sling Removal Guide is exactly what you need to begin their transformation. Replacing worn-out slings is a cost-effective way to revitalize your outdoor furniture, giving it a fresh look and extended life. This process, while seemingly daunting, can be straightforward with the right approach and tools.
This article will walk you through 7 effortless steps to disassemble your patio chair, preparing it for new, custom-made replacement slings. By following these proven methods, you can confidently tackle this DIY project, ensuring your patio furniture is ready for years of enjoyment.
Key Takeaways
- Prepare your workspace and gather essential tools like a rubber mallet and screwdrivers for efficient sling removal.
- Carefully disassemble the patio chair frame, paying attention to fasteners and structural components.
- Master the technique for removing old sling fabric, often involving gentle persuasion and leverage.
- Thoroughly inspect and clean the chair frame to ensure it’s ready for new slings and prevent future issues.
- Explore American Slings’ custom-made, USA-manufactured replacement options for a perfect fit and renewed aesthetic.
- Learn to troubleshoot common challenges like rusted bolts or stubborn fabric during the sling removal process.
- Plan for the next steps, from measuring for new slings to reassembly, to complete your patio furniture restoration.
Step 1: Preparing Your Workspace and Gathering Essential Tools for Sling Removal
Before you begin the sling removal guide process, setting up an organized and safe workspace is crucial for efficiency and preventing damage. A clear, flat surface like a workbench or a sturdy outdoor table provides ample room to maneuver the chair and lay out components. Ensure good lighting and enough space to move around the furniture piece comfortably. This initial preparation can significantly streamline the entire project.
Essential Tools for the Job
Having the right tools on hand will make the disassembly much smoother. You’ll typically need a few basic items that most DIYers already own. For instance, a rubber mallet is invaluable for gently tapping components without causing dents or scratches to the frame.
Here is a list of common tools you will need:
- Rubber Mallet: For gentle persuasion of frame components.
- Flat-head Screwdriver or Putty Knife: Useful for prying apart sling rails.
- Needle-nose Pliers: For gripping and removing small fasteners or pins.
- Cordless Drill/Driver with Hex Bits: For chairs with bolted frames, especially if they use hex-head screws.
- Work Gloves: To protect your hands from sharp edges or rust.
- Penetrating Oil (e.g., WD-40): Essential for loosening rusted bolts or screws.
- Container for Parts: To keep all removed screws, bolts, and caps organized.
American Slings and Patio Supplies also offers specialty DIY tools designed specifically for patio furniture repair. These tools can make the job easier, particularly for stubborn or unique fasteners found on various brands like Brown Jordan or Tropitone.
Step 2: Carefully Disassembling the Patio Chair Frame
The next step in this sling removal guide involves systematically disassembling the patio chair frame to access the sling fabric. Most patio chairs with slings are constructed with a few key bolted or screwed connections that hold the frame together and tension the sling. The goal is to release this tension and separate the frame pieces without damaging them. Always take photos or notes as you go; this will be invaluable for reassembly.
Identifying Fasteners and Connections
Start by examining your chair to identify all bolts, screws, and pins that connect the frame sections. Common connection points include the side rails, crossbars, and sometimes the arms. Many chairs use hex bolts, which can be easily removed with a cordless drill and the appropriate bit. Older chairs might have square-head bolts or even rivets, which require different approaches.
Begin by loosening the bolts on one side of the chair frame. Often, the sling is held taut by the tension created when the frame is fully assembled. Releasing these bolts allows the frame to flex slightly, making the sling easier to remove. Work slowly and methodically, ensuring you don’t strip any screw heads or force components.
For chairs with side rails that slide into channels, you may need to gently tap the frame apart using your rubber mallet. Remember to place all removed fasteners into your designated container to prevent loss. This meticulous approach ensures you have all the necessary hardware when it’s time to install your new slings from American Slings.
Step 3: The Art of Removing the Old Patio Sling Fabric
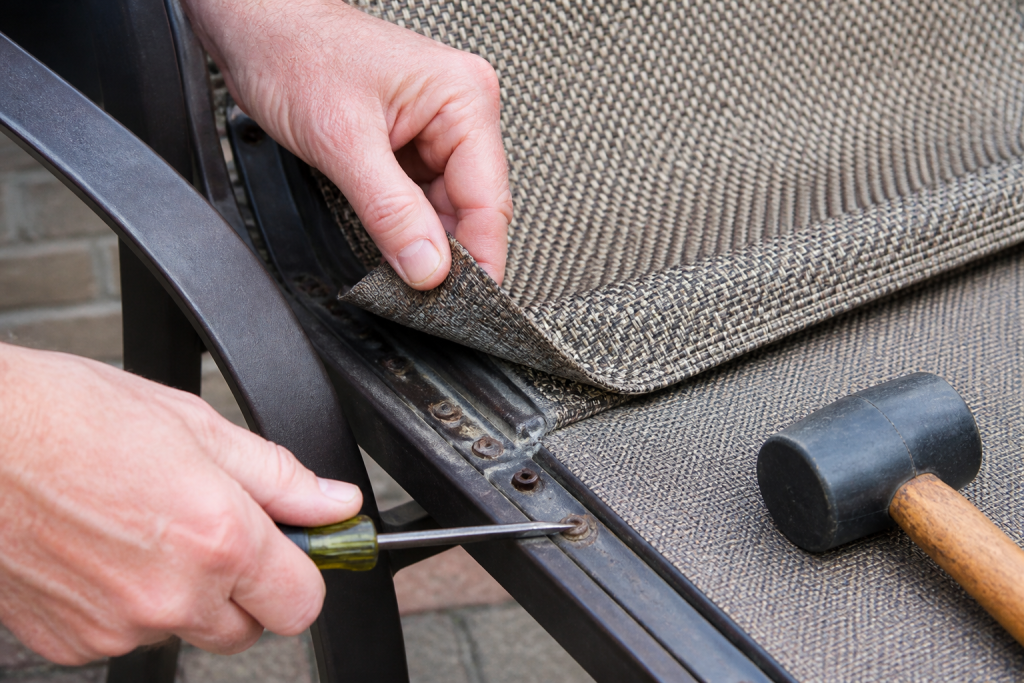
Once the frame is sufficiently loosened, the next phase of the sling removal guide focuses on extracting the old fabric. Patio chair slings are typically held in place by a spline, a thin plastic rod that runs along the edges of the fabric and slots into channels within the chair’s side rails. Removing this spline is key to releasing the old sling. This step often requires a combination of patience and careful leverage.
Extracting the Spline
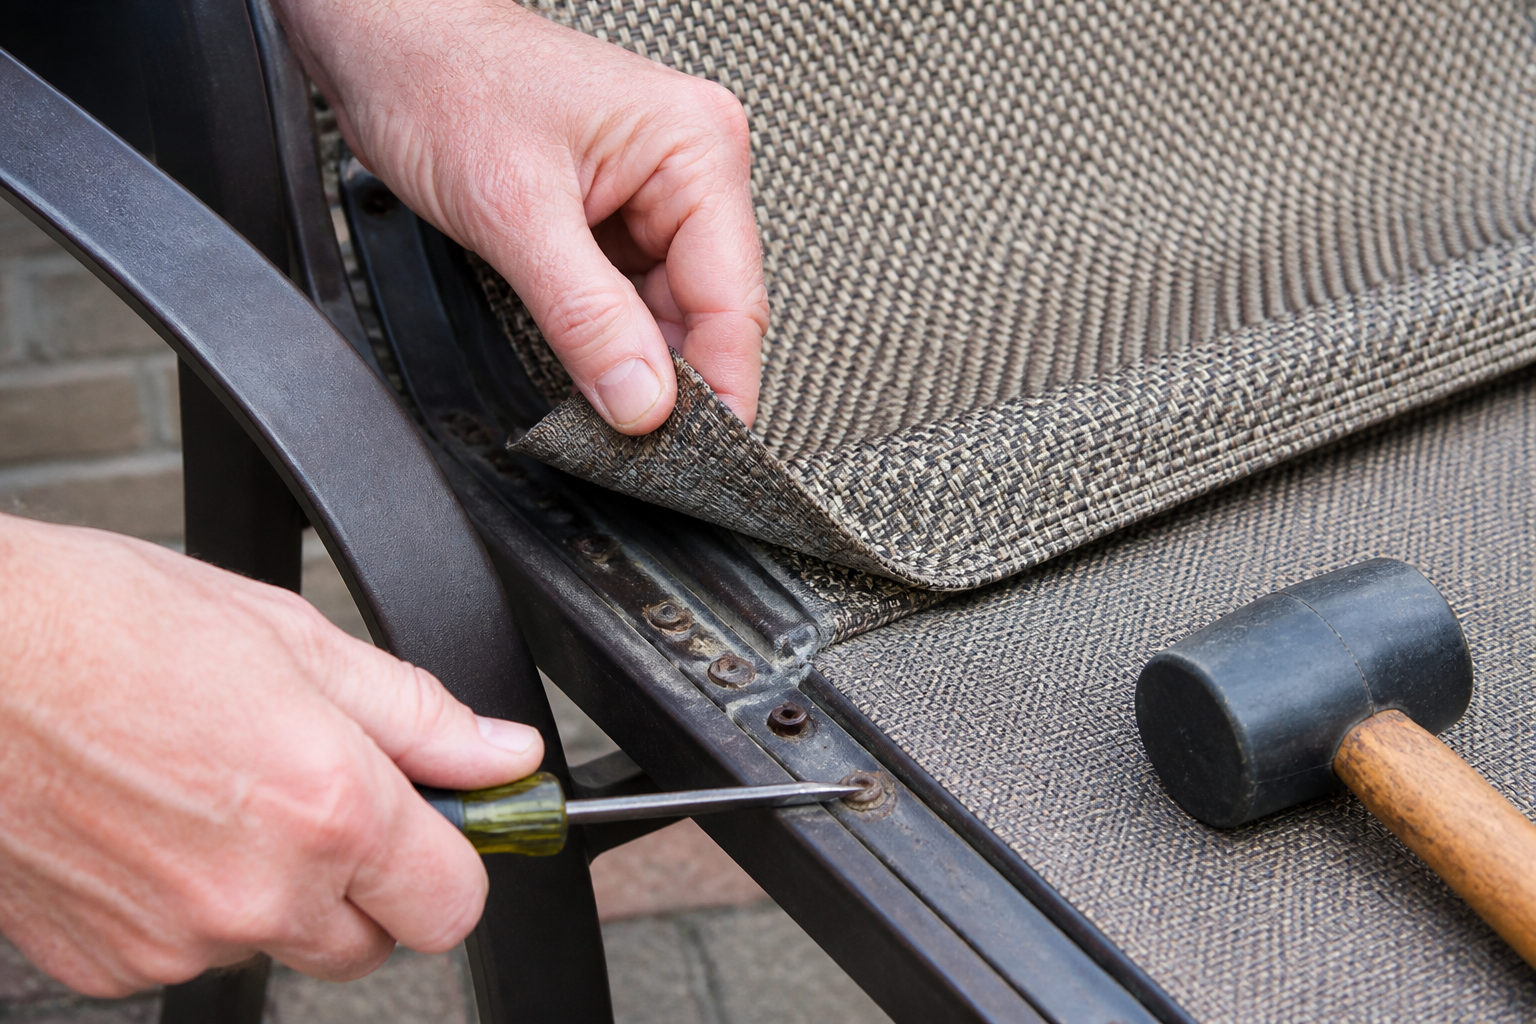
Begin by locating the ends of the spline, usually at the top or bottom of the sling rails. Sometimes, the spline might be tucked under an end cap or a small plastic plug. Use a flat-head screwdriver or a putty knife to gently pry up the edge of the fabric where the spline is visible. Once you have a small section exposed, you can often grip the spline with needle-nose pliers and pull it out of the channel.
If the spline is stubborn or brittle, you may need to work along its length, gently prying and pulling. Be careful not to damage the chair frame’s channels during this process. For particularly tight slings, you might need to further loosen the frame bolts or even completely separate the side rails from the crossbars to reduce tension.
After the spline is fully removed from both sides, the old sling fabric should slide out of the channels. If the fabric is stuck, a little wiggling and gentle pulling will usually free it. This careful approach ensures the frame remains intact and ready for its new, custom-made replacement sling.
Step 4: Inspecting and Cleaning Your Patio Chair Frame
With the old sling successfully removed, this crucial step in the sling removal guide involves a thorough inspection and cleaning of your patio chair frame. This is an opportune moment to assess the frame’s condition, address any minor issues, and prepare it for its new fabric. A clean, well-maintained frame is essential for the longevity and appearance of your newly restored furniture.
Detailed Frame Inspection
Carefully examine every part of the frame for signs of wear, damage, or corrosion. Look for cracks in the metal, especially around bolt holes and welded joints. Check for any bending or warping of the frame components. If you find significant structural damage, it might be necessary to repair or replace those parts before installing new slings. American Slings and Patio Supplies offers a wide array of replacement parts, including end caps, glides, and brackets, which can be vital for restoring the frame’s integrity.
Thorough Cleaning Process
Cleaning the frame removes accumulated dirt, grime, and oxidation that can degrade the metal over time. Start by wiping down the entire frame with a damp cloth and a mild detergent. For stubborn dirt or mildew, a soft brush can be used. Rinse the frame thoroughly and allow it to dry completely.
If you notice any rust spots, gently scrub them with a wire brush or fine-grit sandpaper. After removing the rust, you might consider applying a rust-inhibiting primer and a fresh coat of outdoor-grade paint to protect the frame and give it a renewed look. This attention to detail ensures your patio chair is not only functional but also aesthetically pleasing for years to come.
Step 5: Understanding American Slings’ Custom Replacement Options
After successfully using the Sling Removal Guide and preparing your chair frame, the next exciting step is selecting your new replacement slings. This is where American Slings and Patio Supplies truly shines, offering a tailored solution that ensures a perfect fit and revitalized aesthetic for your outdoor furniture. We specialize in providing high-quality, custom-made replacement patio chair slings and vinyl straps.
Why Choose American Slings?
Since 2008, American Slings has been assisting customers in Florida and nationwide with their patio furniture restoration projects. A key differentiator is that all our slings and straps are manufactured right here in the USA. This commitment to domestic production guarantees superior durability, precise craftsmanship, and an impeccable fit for a wide range of patio furniture brands, including popular names like Brown Jordan, Tropitone, Hampton Bay, and Hanamint.
We understand that every patio chair is unique, which is why we offer an extensive selection of Sunbrella upholstery fabrics by the yard. Sunbrella fabrics are renowned for their fade resistance, durability, and wide array of colors and patterns, allowing you to customize your patio’s look to perfection. We also provide free fabric and strap samples, so you can see and feel the quality before making your final selection.
To ensure you get the exact measurements needed for your custom slings, American Slings offers detailed how-to-measure guides on our website. These resources simplify the process, helping you confidently order replacements that will transform your patio chairs. Our goal is to make your DIY restoration project as straightforward and rewarding as possible, from sling removal to final installation.
Ready to Upgrade Your Patio Chair Slings?
Once you’ve expertly removed your old patio chair slings, it’s time to discover the perfect replacements. American Slings and Patio Supplies offers a vast selection of high-quality, custom-made slings crafted in the USA for durability and an impeccable fit.
Step 6: Common Challenges and Troubleshooting During Sling Removal
Even with a comprehensive sling removal guide, you might encounter a few common hurdles during the process. Older patio furniture, especially pieces exposed to harsh weather, can present unique challenges. Knowing how to troubleshoot these issues can save you time and prevent frustration, ensuring your project stays on track.
Dealing with Rusted Fasteners
One of the most frequent problems is rusted bolts or screws. If a fastener won’t budge, do not force it, as this can strip the head or damage the frame. Instead, apply a generous amount of penetrating oil (like WD-40) to the rusted area. Allow it to soak for at least 15-30 minutes, or even longer for severely corroded parts. Tapping the fastener gently with a hammer can also help the oil penetrate.
After soaking, try loosening the fastener again. If it’s still stuck, you might need to use a wrench with more leverage or consider a bolt extractor kit. For bolts that are completely seized, carefully cutting them with a hacksaw or an angle grinder (with appropriate safety precautions) might be the last resort, though this should be avoided if possible to preserve the frame.
Stubborn Slings and Brittle Splines
Sometimes, the old sling fabric can be incredibly tight or the spline brittle and broken. If the sling is too taut to easily remove the spline, try further loosening the frame bolts. You might even need to completely separate one side rail from the crossbars to relieve enough tension. For brittle splines that break into small pieces, use needle-nose pliers to extract each segment carefully. A small, thin hook tool can also be helpful for fishing out stubborn spline fragments from the channels. Remember, patience is key to avoiding damage to the frame. For more in-depth advice on handling difficult removals, you can often find valuable tips from experienced DIYers on home improvement forums, such as those found on Hometalk.
Step 7: Planning Your Patio’s Refresh: What Comes After Sling Removal
Completing the sling removal guide is a significant milestone in your patio furniture restoration project, but it’s only the beginning of your patio’s refresh. With the old slings gone and the frame cleaned, you’re now perfectly positioned to bring your outdoor space back to life. The next steps involve precise measurements, selecting new materials, and ultimately, installing your custom replacement slings.
Accurate Measurement for New Slings
The most critical step after removal is accurately measuring your chair frame for new slings. American Slings and Patio Supplies provides comprehensive how-to-measure guides on our website, ensuring you capture every dimension correctly. These guides detail how to measure the length and width of the sling rail channels, as well as the overall dimensions of the old fabric if it’s still intact enough to use as a reference. Precise measurements are essential for a perfect custom fit, preventing issues like sagging or overly tight slings.
Selecting Your New Fabric and Components
With measurements in hand, you can now explore the vast selection of replacement options available from American Slings. Choose from durable, USA-made custom slings in a variety of Sunbrella fabrics to match your aesthetic. Consider ordering free fabric samples to see how different colors and textures look in your outdoor environment. This is also the time to order any replacement parts identified during your frame inspection, such as new end caps, glides, or bolts, to ensure your chair is fully restored.
Installation and Enjoyment
Once your custom slings and any necessary parts arrive, you’ll be ready for installation. American Slings also provides detailed installation guides to walk you through the process of putting your chair back together with its new fabric. With your newly restored patio chairs, you can look forward to enjoying a refreshed outdoor living space that is both comfortable and stylish. This entire process, from the initial sling removal guide to the final installation, offers a rewarding DIY experience and significantly extends the life of your patio furniture.
The journey from worn-out patio chairs to beautifully restored outdoor seating is a rewarding one. By following this comprehensive Sling Removal Guide, you’ve taken the essential first step towards revitalizing your outdoor space. Remember, American Slings and Patio Supplies is your trusted partner for high-quality, custom-made replacement slings and all the tools you need to complete your project. We’ve been helping DIYers in Florida and across the nation since 2008, ensuring your patio furniture looks its best.
Visit our website today to explore our extensive selection and begin the next phase of your patio’s transformation.
Frequently Asked Questions About Patio Sling Removal
What tools are essential for patio chair sling removal?
Essential tools for patio chair sling removal typically include a rubber mallet, a flat-head screwdriver or putty knife, needle-nose pliers, and potentially a cordless drill for stubborn fasteners. Having a work surface and a pair of gloves can also make the process much smoother and protect your hands.
How long does it typically take to remove a patio chair sling?
The time required to remove a patio chair sling can vary depending on your experience and the chair’s condition. For most standard patio chairs, the removal process can take anywhere from 30 minutes to an hour per chair. Older chairs with rusted components might require a bit more effort and time.
Can I reuse the old sling fabric after removal?
While you can technically reuse the old sling fabric as a template for new measurements, it is not recommended to reinstall it if it’s damaged, faded, or stretched. American Slings and Patio Supplies specializes in durable, custom-made replacements designed to rejuvenate your furniture and last for years, offering a superior alternative to reusing worn material.
What are common mistakes to avoid when removing patio chair slings?
Common mistakes include forcing rusted components, using improper tools that can damage the frame, and not documenting the disassembly process. Taking photos or notes during each step of sling removal can help immensely for reinstallation, preventing frustration and errors.
Why should I consider replacing my patio chair slings?
Replacing your patio chair slings can significantly extend the life of your outdoor furniture, offering a cost-effective alternative to buying entirely new chairs. It allows you to refresh your outdoor aesthetic with new fabrics, improve comfort, and restore the structural integrity that worn slings can compromise. American Slings provides custom options for a perfect fit.
How do I measure for new replacement slings after removal?
After removing the old sling, it’s crucial to measure the exact dimensions of the sling rail channels and the old fabric itself for accurate replacements. American Slings and Patio Supplies offers comprehensive how-to-measure guides on our website, ensuring you get the precise measurements needed for a perfect custom-made sling.
Where can I find high-quality replacement slings and tools?
For high-quality replacement slings, vinyl straps, Sunbrella fabrics, and all the specialty tools needed for DIY patio furniture repair, visit American Slings and Patio Supplies. We manufacture custom slings in the USA to ensure durability and a perfect fit for a wide range of patio furniture brands.
Frequently Asked Questions About Patio Sling Removal
What tools are essential for patio chair sling removal?
Essential tools for patio chair sling removal typically include a rubber mallet, a flat-head screwdriver or putty knife, needle-nose pliers, and potentially a cordless drill for stubborn fasteners. Having a work surface and a pair of gloves can also make the process much smoother and protect your hands.
How long does it typically take to remove a patio chair sling?
The time required to remove a patio chair sling can vary depending on your experience and the chair’s condition. For most standard patio chairs, the removal process can take anywhere from 30 minutes to an hour per chair. Older chairs with rusted components might require a bit more effort and time.
Can I reuse the old sling fabric after removal?
While you can technically reuse the old sling fabric as a template for new measurements, it is not recommended to reinstall it if it’s damaged, faded, or stretched. American Slings and Patio Supplies specializes in durable, custom-made replacements designed to rejuvenate your furniture and last for years, offering a superior alternative to reusing worn material.
What are common mistakes to avoid when removing patio chair slings?
Common mistakes include forcing rusted components, using improper tools that can damage the frame, and not documenting the disassembly process. Taking photos or notes during each step of sling removal can help immensely when it comes to reinstallation, preventing frustration and errors.
Why should I consider replacing my patio chair slings?
Replacing your patio chair slings can significantly extend the life of your outdoor furniture, offering a cost-effective alternative to buying entirely new chairs. It allows you to refresh your outdoor aesthetic with new fabrics, improve comfort, and restore the structural integrity that worn slings can compromise. American Slings provides custom options for a perfect fit.
How do I measure for new replacement slings after removal?
After removing the old sling, it’s crucial to measure the exact dimensions of the sling rail channels and the old fabric itself for accurate replacements. American Slings and Patio Supplies offers comprehensive how-to-measure guides on our website, ensuring you get the precise measurements needed for a perfect custom-made sling.
Where can I find high-quality replacement slings and tools?
For high-quality replacement slings, vinyl straps, Sunbrella fabrics, and all the specialty tools needed for DIY patio furniture repair, visit American Slings and Patio Supplies. We manufacture custom slings in the USA to ensure durability and a perfect fit for a wide range of patio furniture brands.